Work-from-Home Wi-Fi Readiness with inSSIDer
In this article, learn how to use inSSIDer to get a picture of your dual-band Wi-Fi environment, pick the best channel, and set up WPA so you can enjoy stable, secure home Wi-Fi when working from home.
Basic W-Fi Lessons
With so many people being asked or encouraged to work from home due to the Coronavirus (COVID-19), home Wi-Fi has suddenly moved from nice-to-have to mission-critical. It's one thing when Netflix or Disney+ stops mid-show… but when you can't get video conferencing to work for an important meeting suddenly the Wi-Fi in your home really matters. This article will walk you through simple steps to get your Wi-Fi ready for the serious business of working from home.
Getting Started
The first thing you need to do is create a free account at metageek.com and download inSSIDer for Windows or inSSIDer for Mac.
This tutorial will use inSSIDer for Windows, and most functionality is also available in the Mac beta version.
This tutorial may suggest you make changes to your Wi-Fi settings - If you are unsure about where to go to change your Wi-Fi settings our Guide to Change Wireless Router Settings will help you find the settings for popular access points.
Once you have inSSIDer installed, sign in using the account you've just created. The first thing you'll see in inSSIDer is a big table listing all the Wi-Fi networks in your environment.
If you are using Wi-Fi to connect to the Internet your network should be highlighted in yellow and have a big yellow star next to it.

If your network isn't starred, click on the table column labeled "Signal" to sort the table by signal strength - this will put the strongest signals at the top of the table, which should be the Wi-Fi access points closest to you. Select your network by clicking on its table row - it should now be highlighted in blue. Then click the binoculars icon to view details about your network. If you have more than one Wi-Fi network name (SSID) that's great - this article will focus on one network at a time.
2.4 or 5 GHz Band?
Now that you've drilled into your network, inSSIDer will look like one of the two screenshots below. If inSSIDer looks like the screenshot on the left ( Single Access Point Radio), then you have a single access point radio. Look at the channel number in the Config section - if the channel is Channel 36 or higher go to the Setting up a 5 GHz Network section and if it's Channel 14 or lower go to the Setting up a 2.4 GHz Network section.
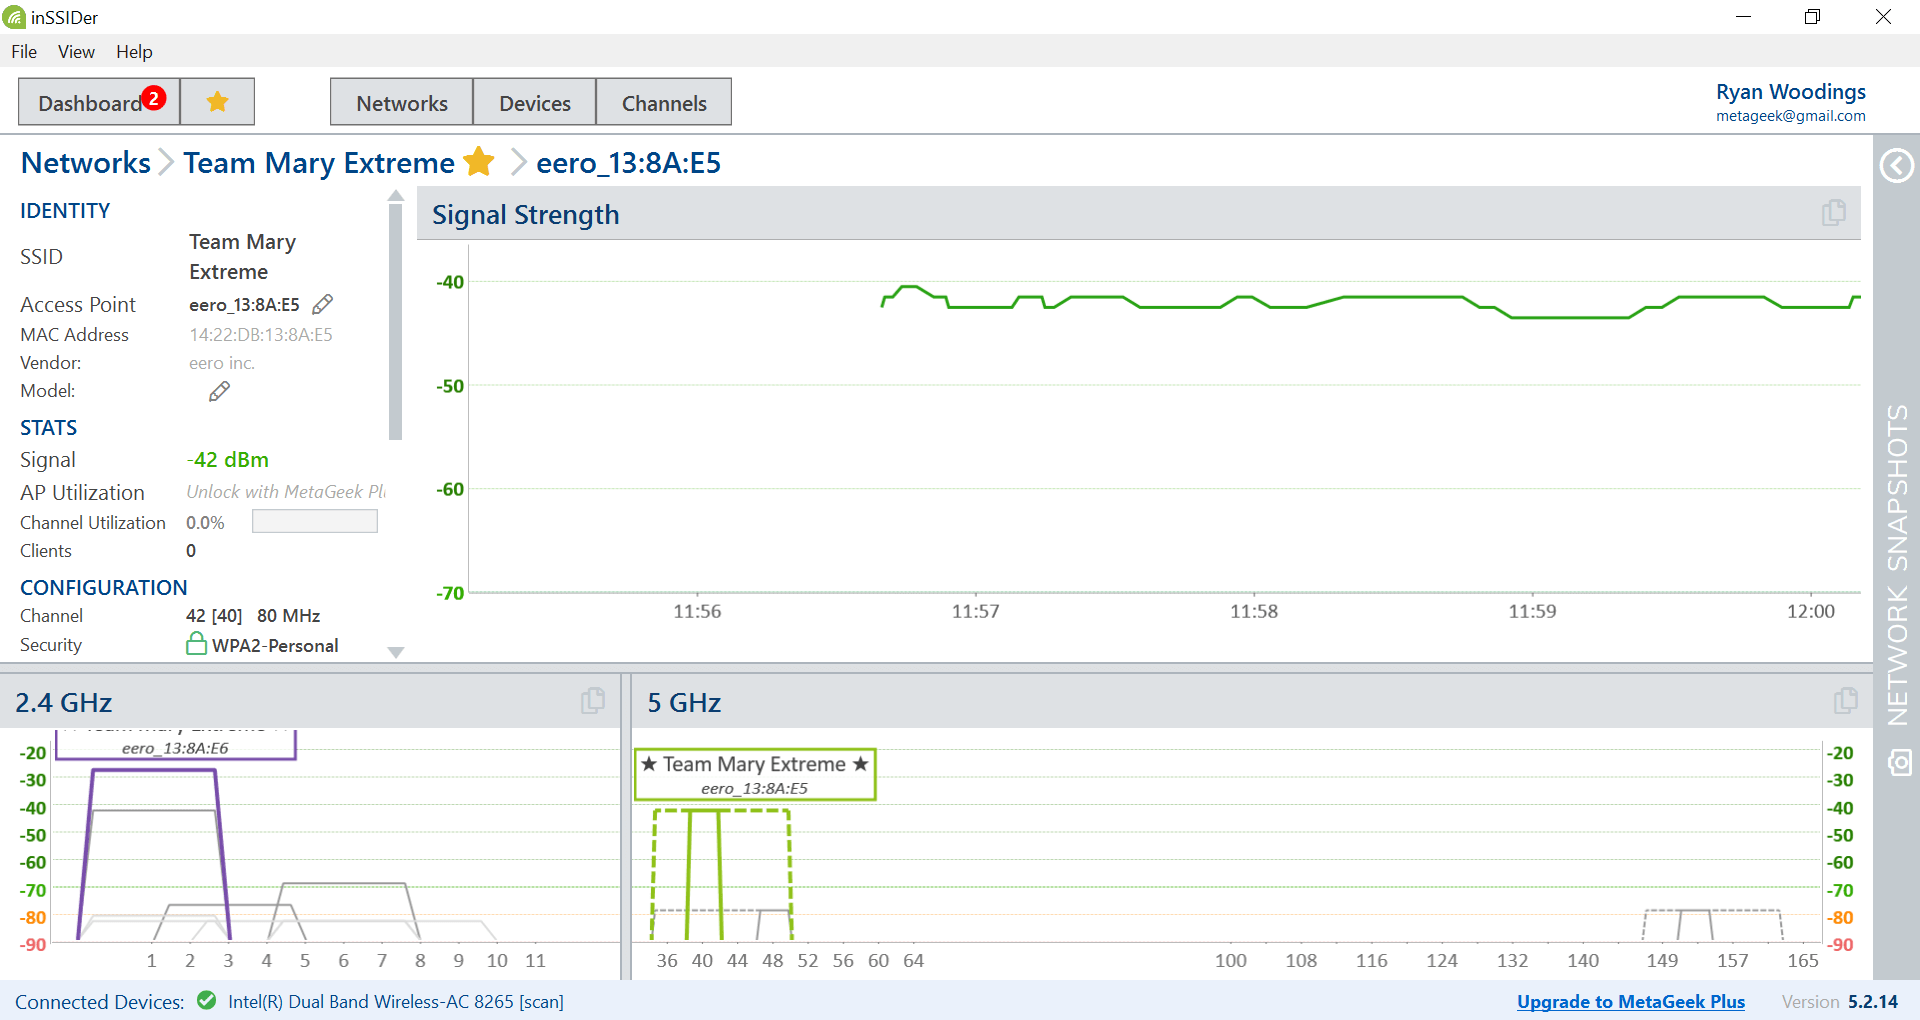
Single Access Point Radio
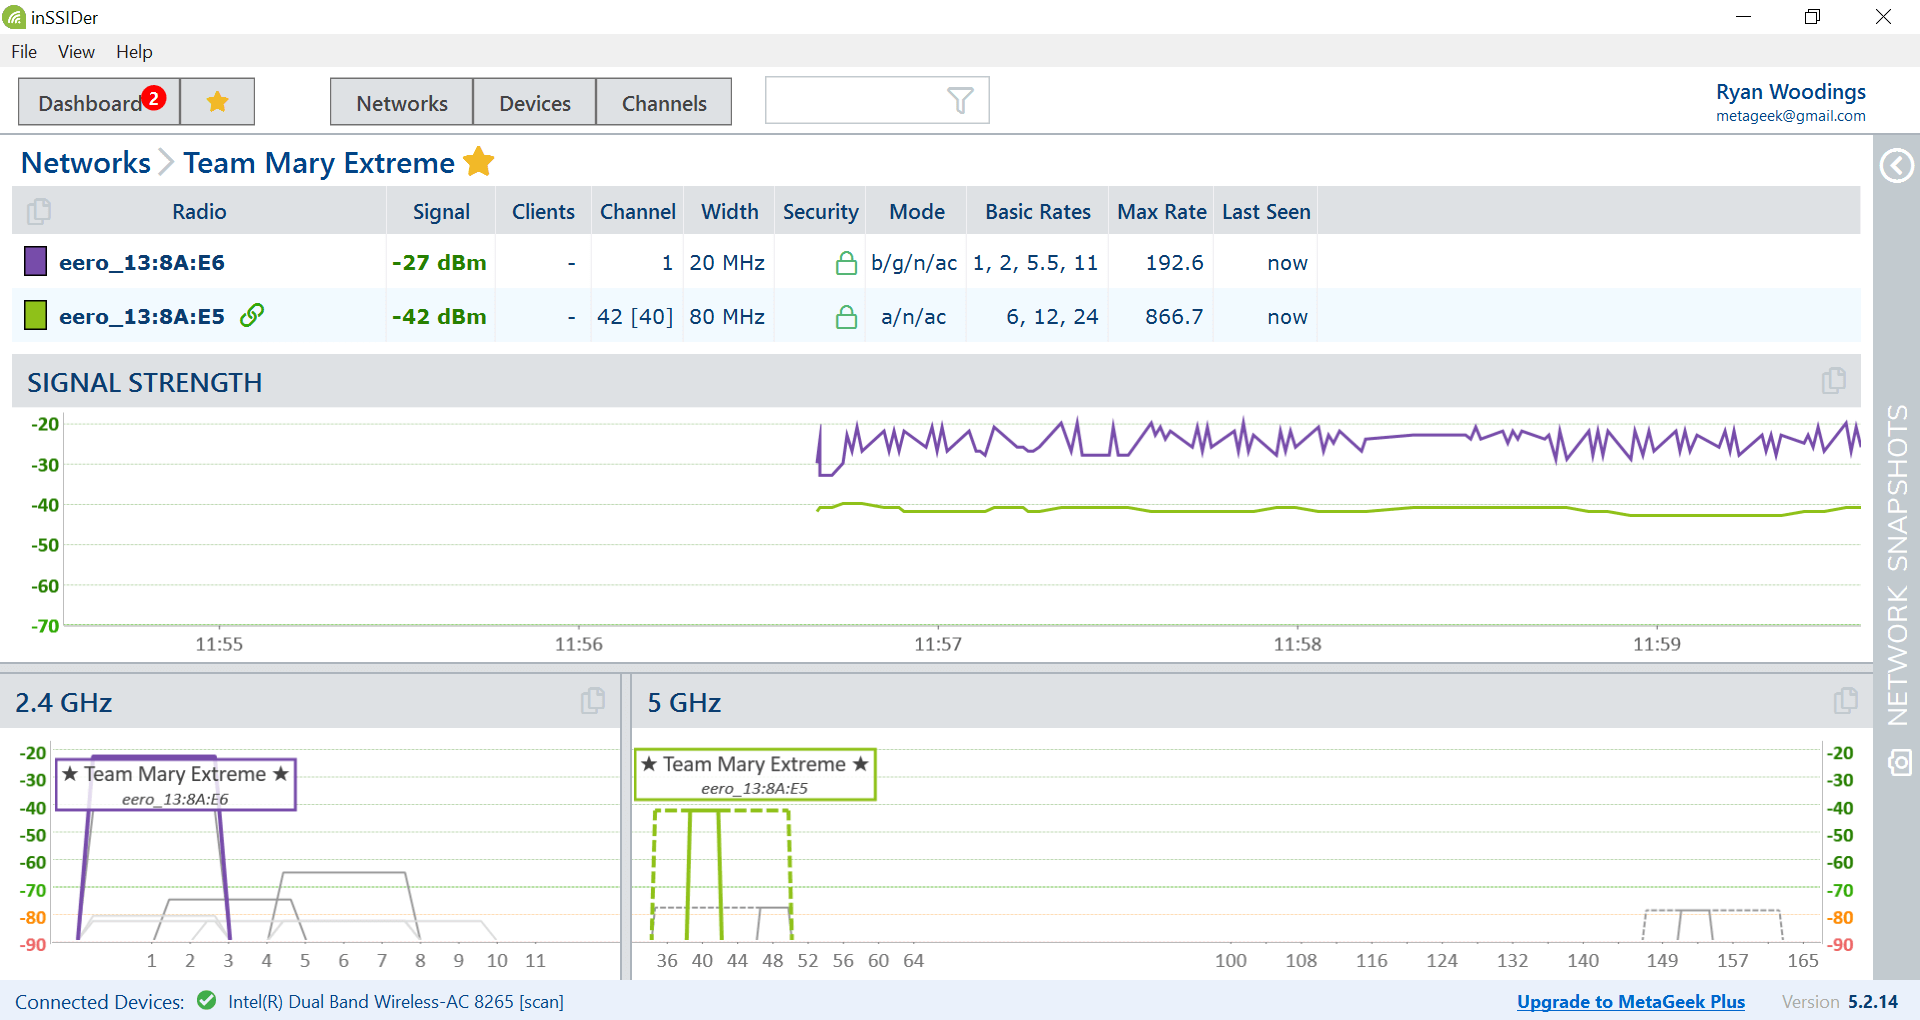
Multiple Access Point Radios
If inSSIDer looks like the screenshot on the right ( Multiple Access Point Radios) then you either have multiple access points or are using multiple bands. Click each row in the table and observe the highlighted shape in the bottom graphs. These shapes are showing the channel and signal strength of each access point radio. The gray shapes are other Wi-Fi access points in your environment.
If your Wi-Fi environment is like most Wi-Fi environments you will notice a LOT of Wi-Fi networks in the 2.4 GHz graph that overlap and are drawn on top of each other. In most places the 2.4 GHz band is really crowded, which is like being in a crowded bar with people talking loudly over the top of you - not a great place to get work done.
We encourage everyone to use 5 GHz if possible. Let's go back to the table and look at the Channel column - do you have a radio that is on channel 36 or higher? This is the 5 GHz band. If you don't have a 5 GHz access point it might be time to upgrade - this will have a bigger impact on your Wi-Fi performance than anything else in this tutorial.
Setting up a 5 GHz Network
If you have a 5 GHz access point, let's now look at the "Width" column. 5 GHz Wi-Fi networks can use channel widths of 20, 40, 80, or 160 MHz. Like most things in life, bigger isn't always better. We recommend 20 or 40 MHz channel widths if there are other Wi-Fi networks in your environment. If your access point channel width is set to 20 or 40 MHz you are set up great and can jump to the next section - Setting up a 2.4 GHz Network.
If you are using 160 MHz channel width you should definitely reduce it! (Not sure how to do this? Check out our Finding Wi-Fi Settings For Your Access Point Guide) If you are using 80 MHz channel width you might be okay. Are there other networks in the graph that are above -70 dBm that are on the same section of channels as you?

80 MHz Wide Channel without Loud Neighbors - This is Okay
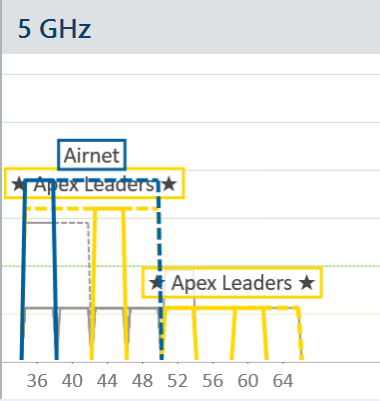
80 MHz Wide Channel with Loud Neighbors - This is a Shouting Match
If there are other networks above -70 dBm, please reduce your channel width to 40 MHz. If there aren't other networks, you are probably okay to use the 80 MHz channel without being a rude neighbor. While really wide channel widths allow you to use higher Wi-Fi data rates, cooperating with your neighbors usually produces better results than having a shouting match by using wide channels.
Setting up a 2.4 GHz Network
Now that the 5 GHz network is set up with a good channel width, let's take a look at 2.4 GHz. Do you have an access point on channel 11 or lower? In Europe and Asia the 2.4 GHz band might go up to channel 14. If you have an access point in the 2.4 GHz band, we recommend giving it a different network name than your 5 GHz access point if possible. In Wi-Fi the device chooses which access point it tries to connect to - the access points have a few tricks to encourage the device to make a good choice, but ultimately it's the device's decision… and many devices make poor decisions.
Usually the 2.4 GHz signal is slightly stronger than the 5 GHz signal, so most devices prefer to connect to 2.4 GHz if it's available. Remember, 2.4 GHz is the party band with all the loud talkers. By ONLY having 5 GHz access points on a network (SSID) you can force your devices to choose 5 GHz. Some older devices and most IoT devices only have 2.4 GHz radios, so connect those devices to the 2.4 GHz SSID (network name) and they will be happy, leaving your 5 GHz network available for you to get work done.
In 2.4 GHz the channels are numbered funny. Wi-Fi networks need at least 20 MHz channel width, but channels are numbered every 5 MHz, which means that channel 1 overlaps with channels 2, 3, and 4. In the United States it is best practice to ONLY use channels 1, 6 and 11, because these channels don't overlap. In Europe, Asia, and other countries that have channels 12 and 13, it is best practice to use channels 1, 5, 9, and 13. Sometimes the U.S. practice of 1, 6, and 11 is used outside the United States, so if channels 12 and 13 are available in your country, use your best judgment as to which set of standard channels is being used in your Wi-Fi environment - either 1,6, and 11 or 1, 5, 9, and 13. If you are using any other channel number (e.g. channel 2) then you should stop right now and change the channel to a standard channel. Go on, we'll wait for you. Overlapping channels is the biggest cause of poor performance in the 2.4 GHz band.
While we allowed 40 MHz and sometimes 80 MHz wide channels in 5 GHz band, the 2.4 GHz band is a lot smaller with only three non-overlapping channels at 20 MHz, so we strongly recommend against using 40 or 80 MHz wide channels in 2.4 GHz.
Security
With your Wi-Fi networks on good channels we will move on to the topic of security. Even if you are using a VPN for work, it's best to also have good security at the Wi-Fi level. There have been a few iterations of Wi-Fi Security starting with WEP and then WPA, WPA2 and now WPA3. WEP had serious flaws and is no longer used. WPA is also fairly old and has a number of known vulnerabilities, so we recommend using WPA2 or WPA3.
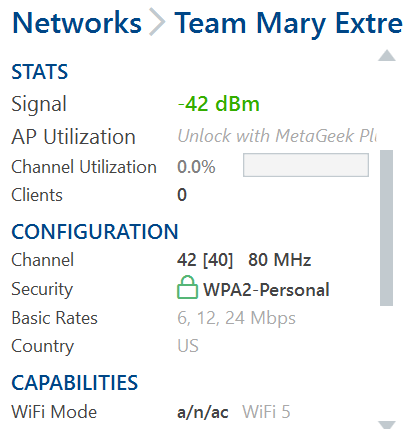
Any router purchased in the past few years should have WPA2 and new routers are shipping with WPA3. One thing to look for though is that some routers turn on WPA2 and WPA, which isn't as secure as just using WPA2. It's easy to figure out what security your access points are using by looking at the Security column in inSSIDer. If you see a green padlock you have at least WPA2. If you click the binoculars icon on each access point you can also drill down into the access point and then it will say "WPA2-Personal." There's also a WPA2-Enterprise version, which allows every user to have a different password; your office Wi-Fi probably uses WPA2-Enterprise or WPA3-Enterprise.
If your access point is using WEP or WPA, go into the security settings and look for options to ONLY use WPA2 or WPA3. If WPA2 or higher is not available it's time to upgrade your Wi-Fi access point.
Congratulations! Your Wi-Fi is on its way to being ready for you to work from home. In Part 2 we will check signal strength and data rate in the areas of your home where Wi-Fi is used the most.
Why Channels 1,6,11